User Guide
Thank you for downloading the Interimage Watch Calculator. This application calculates and records the real-world daily rate of your mechanical timepiece based on network time (synchronized with an atomic clock) and a photo of the dial.
Interimage Watch Calculatorをダウンロードいただきありがとうございます。本アプリケーションは、ネットワーク時刻(原子時計同期)と撮影したダイヤルの画像から、機械式時計の実世界での歩度(日差)を計算し記録するアプリケーションです。
We recommend taking measurements 1 to 3 times a day. Repeated measurements over a short period (e.g., within an hour) are not recommended, as they may yield temporary abnormal values.
1日に1~3回程度の測定(撮影)を行うことを推奨しています。短時間(1時間以内など)に繰り返し測定を行うと、一時的に異常な値が算出される可能性があるためお勧めしません。
Contribution to AI Training (AI学習への画像提供について)
Upon the first launch, you will be asked to grant permission to contribute your watch images for AI training. This feature is being developed with the goal of accurately reading the time directly from dial images without manual adjustments in the future.
初回起動時、AI学習用の画像の提供について許可のお願いが表示されます。この機能は、将来的には手動での調整なしでダイヤル画像から正確な時間を自動で読み取ることを目標に開発しています。
If you agree to contribute, please ensure that no personal information is captured in your photos. You can disable this permission at any time in the Settings screen. Additionally, you can opt out of sending individual images by unchecking "Send Image" before saving a measurement.
画像の提供にご協力いただける場合、撮影画像に個人情報などが写りこまないようご注意ください。※画像提供の許可は設定画面からいつでもOFFにできます。また、測定後の保存時に「Send Image」のチェックを外すことで、その画像のみ個別に送信を拒否することも可能です。
Quick Start Guide (簡単な使用手順)
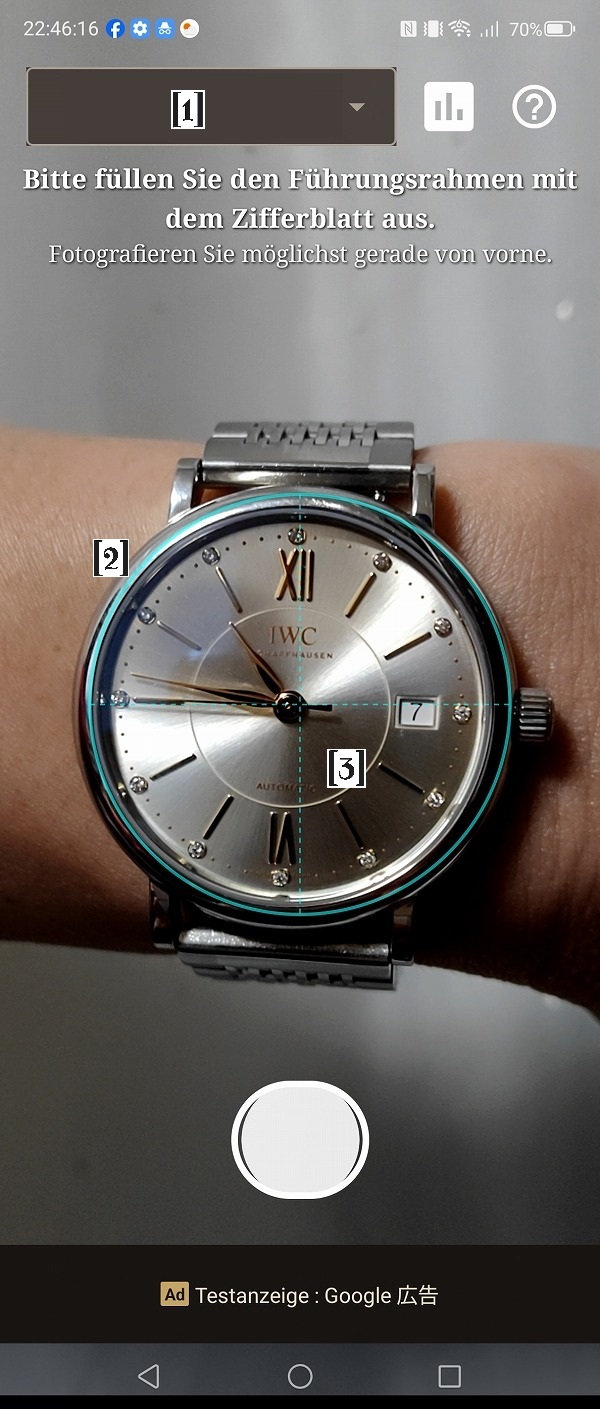
Step 1. Take a Photo (時計の写真を撮る)
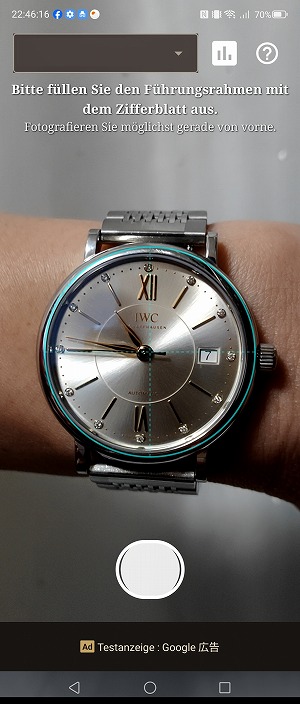
Select the target watch from the dropdown menu and take a photo of the dial. Please shoot straight on from the front, filling the guide frame as much as possible. Tap the screen to adjust focus and exposure.
測定対象の時計をプルダウンから選択し、時計のダイヤルの写真を撮影してください。なるべく枠線いっぱいに、正面から真っすぐ撮影してください。画面をタップすると、その位置でピントや露出の調整を行います。
*If you take a photo without selecting a watch, it will be saved as "Unknown". You can edit this later.
※時計を選択せずに撮影した場合、「Unknown」という時計名で保存されます。これは後から変更可能です。
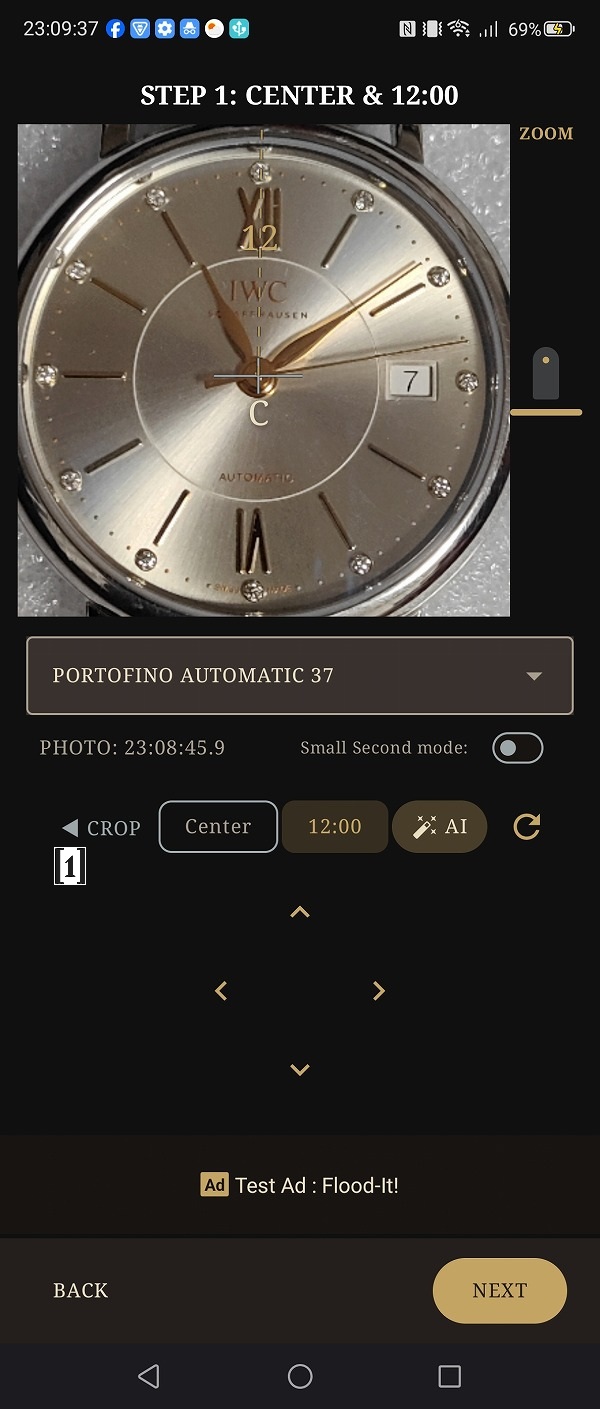
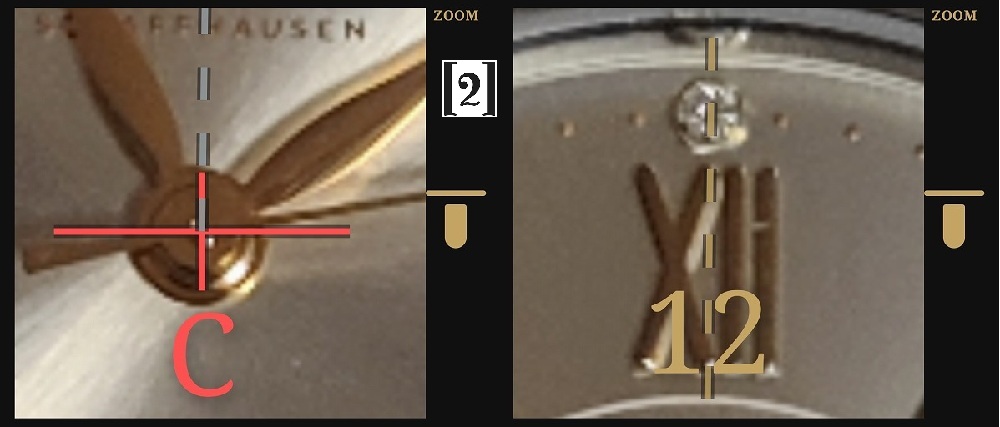
Step 2. Align Center & 12 o'clock (中心と12時方向の調整)

Align the center of the 'C' crosshair precisely with the center axis of the hour and minute hands. Then, align the '12' line with the 12 o'clock marker. Once adjusted, press NEXT.
時針・分針の中心位置に「C」の十字の中心をぴったり重ねてください。次に、12時の方向にラインを合わせます。調整が終わったらNEXTを押してください。
*Auto-Alignment: If "AI Historical Adjustment" is enabled in settings, the app will attempt to automatically align the center and 12 o'clock positions based on your past images.
※自動補正について:設定で自動調整がONの場合、過去の計測画像と比較して中心と12時の位置を自動で調整します。Watch Collectionで「学習(Train)」を行っていると、処理時間の短縮と精度の向上が期待できます。
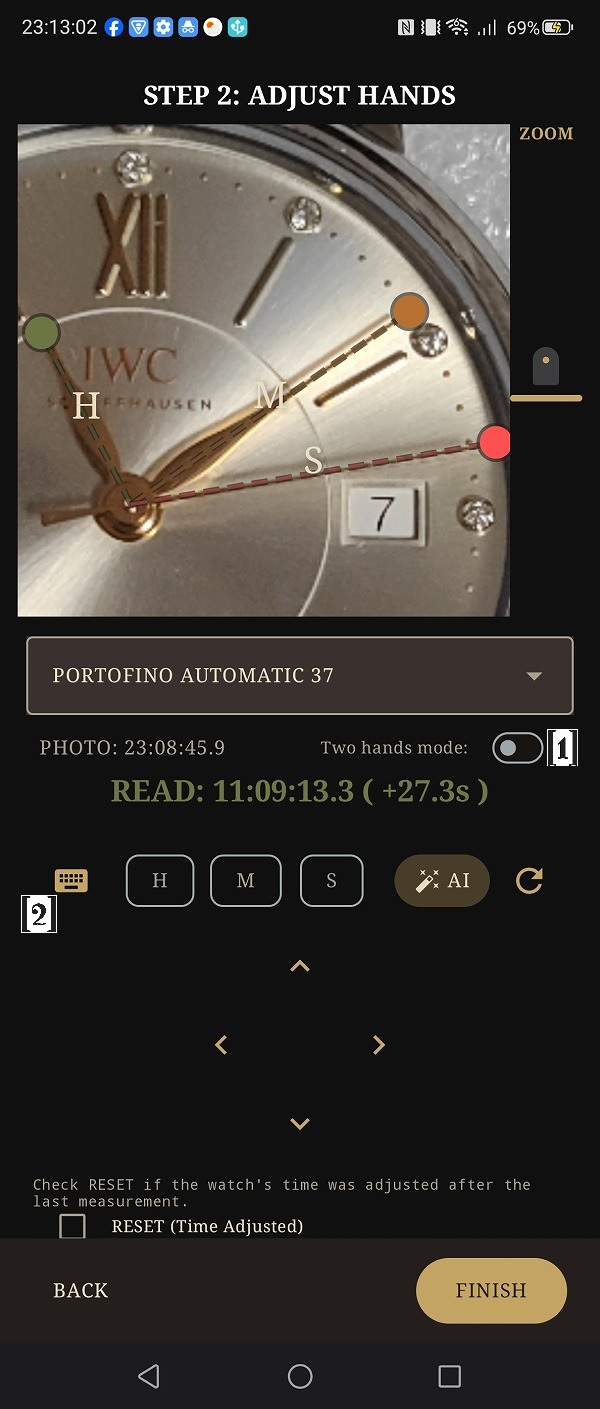
Step 3. Align Hands (針の角度の調整)
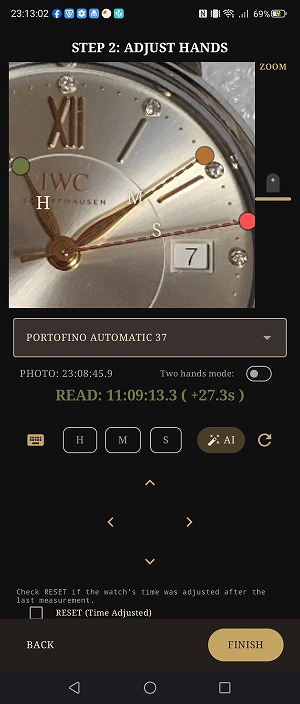
Drag the lines to perfectly overlap the center of the Hour (H), Minute (M), and Second (S) hands. You can use the D-pad or Wheel Picker for fine-tuning. Confirm the read time displayed on the screen is correct, then press FINISH.
それぞれの針のラインを、写真の針の中心とピッタリ重なるようにドラッグして調整してください。Dパッド(十字キー)やホイールピッカーで微調整が可能です。画面に表示される読み取り時刻が正しいことを確認し、Finishを押してください。
*The app is designed for 12-hour analog dials. Whether it is AM or PM, the time is processed correctly without affecting the daily rate calculation.
※本アプリはAM/PMの概念の無いアナログ時計を前提に設計されています。午前/午後に関わらず日差は正しく計算されます(仕様上、6時間を超えるズレは正しく測定できません)。
Step 4. Check the Dashboard (ダッシュボードの確認)
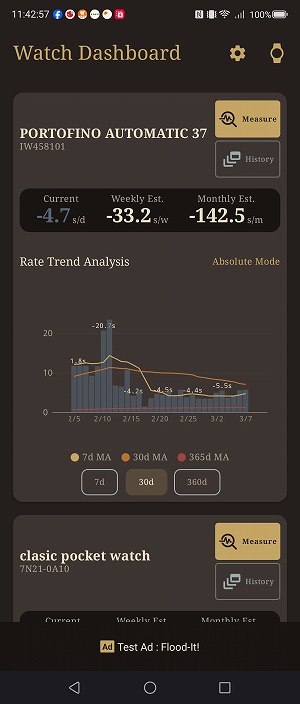
Review the measurement results of your registered timepieces. You can check the Current daily rate, Estimated Weekly deviation, and Estimated Monthly deviation to help plan your next time adjustment.
登録された時計の計測結果を確認します。現在の日差(Current)、予想週差、予想月差が表示され、次回の時刻合わせの計画に役立ちます。
Screen Reference & Features (各画面の詳細と機能)
4.1 Dashboard & Graph (ダッシュボードとグラフセクション)
-
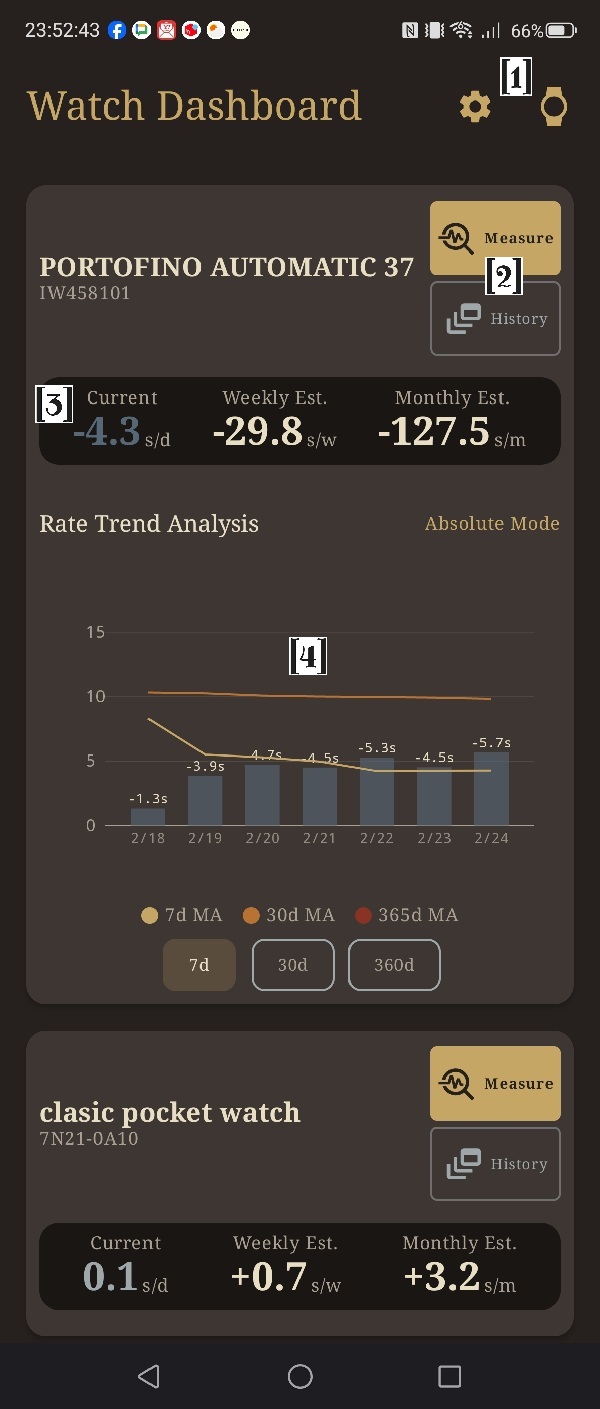
[1] Settings & Add Watch
Access app settings or add a new timepiece to your collection from the top bar.
トップバーのアイコンから、アプリの設定(Settings)画面を開いたり、新しい時計の登録(Add Watch)を行います。
-
[2] Measure & History
Use these buttons on each watch card to start a new measurement or view its history list.
各時計のカード内にあるボタンから、新しい計測の開始(Measure)や、その時計の履歴の確認(History)を行います。
-
[3] Current Rate & Estimations
Displays the current daily rate calculated from recent measurements, along with weekly and monthly deviation estimates.
直近の測定から計算した現在の日差(歩度)と、予想される週差・月差の推定値を表示します。
-
[4] Graph Section
Tap a watch card to expand the graph. You can toggle between Absolute and Bipolar (±) modes. Displays data ranges for 7, 30, or 360 days, with moving average lines (MA) included.
時計のカードをタップするとグラフが展開されます。絶対値モードと±モード(バイポーラ)の切り替え、期間の変更が可能です。十分なデータがある場合、移動平均線も表示されます。
4.2 Camera (撮影画面)
-
[1] Watch Selector
Select the timepiece you wish to measure. This can be changed later if needed.
計測する時計を選択します。測定後に変更することも可能です。
-
[2] Guide Reticle
Try to fill this frame completely with the watch dial, shooting as straight as possible.
なるべくこの枠いっぱいに、正面から真っすぐ時計のダイヤルを撮影してください。
-
[3] Focus Area
Tap anywhere on the screen to focus and adjust exposure for that specific point.
画面をタップすると、その箇所にピントと露出(明るさ)を合わせます。
4.3 Alignment: STEP 1 & Crop (計測:中心・12時方向と視差補正)
-
[1] CROP Mode Button
If you couldn't shoot the dial perfectly straight, use CROP mode to correct the perspective by aligning the 12, 3, 6, and 9 o'clock markers.
正面から撮影できなかった場合、CROPモードを使用し、12時、3時、6時、9時の位置を合わせることで視差を補正できます(精度は多少低下します)。
-
[2] Center (C) & 12 o'clock Markers
Markers to designate the center axis of the main hands and the 12 o'clock direction.
時針・分針の軸の中心と、12時の方向を指定するためのマーカーです。
-
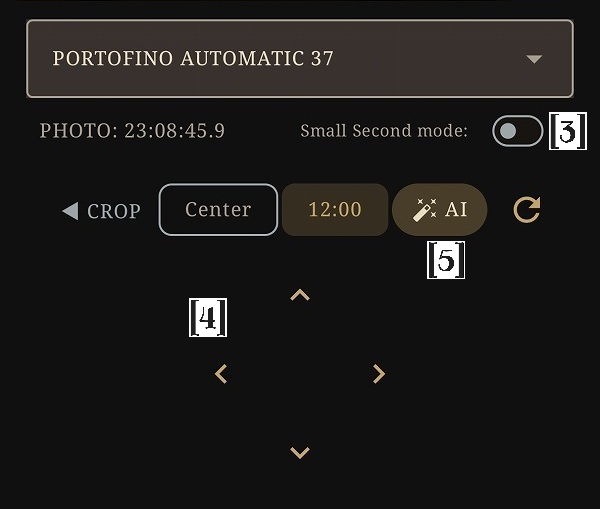
[3] Sub-dial Mode (Small Second)
Enable this switch if your watch has a small second sub-dial. A new 'S' marker will appear to mark the sub-dial's center.
時計がスモールセコンド(秒針が独立しているデザイン)の場合にONにします。スモールセコンド用の「S」マーカーが表示されます。
-
[4] D-pad (十字キー)
Tap for micro-adjustments, or hold for continuous movement.
タップで微量に操作し、押し続けると連続で移動します。微調整にご利用ください。
-
[5] AI Button (Beta)
Available if Developer Options are enabled. Attempts to automatically detect the center and 12 o'clock position (experimental).
設定で開発中AI機能がONの場合のみ表示されます。AIによるダイヤルの自動解析を試みます(実験的な機能です)。
4.4 Alignment: STEP 2 (計測:針の調整と保存オプション)
-
[1] Two Hands Mode
Enable this if your watch lacks a second hand. The app will calculate seconds based on the minute hand's angle.
秒針の無い時計を測定する際にONにします。分針の角度から秒数を計算します。
-
[2] Wheel Picker Toggle
Switches the control method from the D-pad to a scrolling Wheel Picker for time input.
操作方法をDパッド(十字キー)から、ダイヤルを回して数値を入力するホイールピッカーに切り替えます。
-
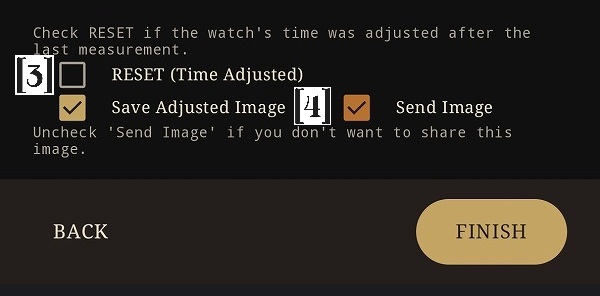
[3] RESET Checkbox
Check this if you have manually adjusted the time on your watch (using the crown) since the last measurement. It establishes a new baseline.
前回の計測から今回の間に、リューズ操作等で時刻合わせを行った場合にチェックを入れます。過去のズレをリセットし、新たな基準点として計算します。
-
[4] Save / Send Image Options
"Save Image" stores the photo locally for future reference and auto-alignment. "Send Image" uploads it for AI training (if opted in).
「Save Image」は画像を端末に保存します(自動補正や履歴の確認に使用されます)。「Send Image」はAI学習のために画像を提供します。
4.5 Watch Collection (時計コレクション)
-
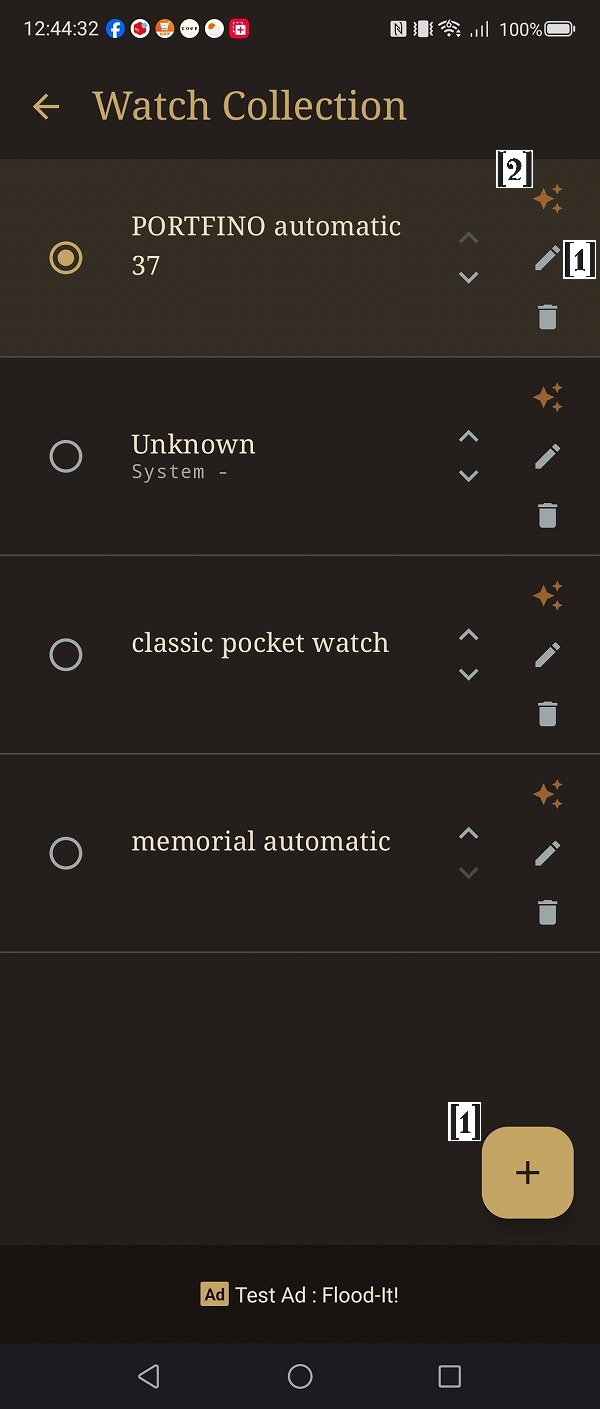
[1] Add (+) & Edit (🖋)
Register a new timepiece or edit the name, brand, caliber, and notes of an existing one.
新しい時計の登録や、既存の時計の名前、ブランド、キャリバー等の情報を修正します。
-
[2] Train Button (✨)
Analyzes past measurement photos to learn the specific features of your watch, drastically improving auto-alignment accuracy. Takes 5–10 minutes.
過去の測定画像を分析して時計の特徴を学習し、自動補正機能の精度を高めます。データ量により数分〜10分程度かかります。
4.6 History & Edit (履歴一覧と履歴編集)
-
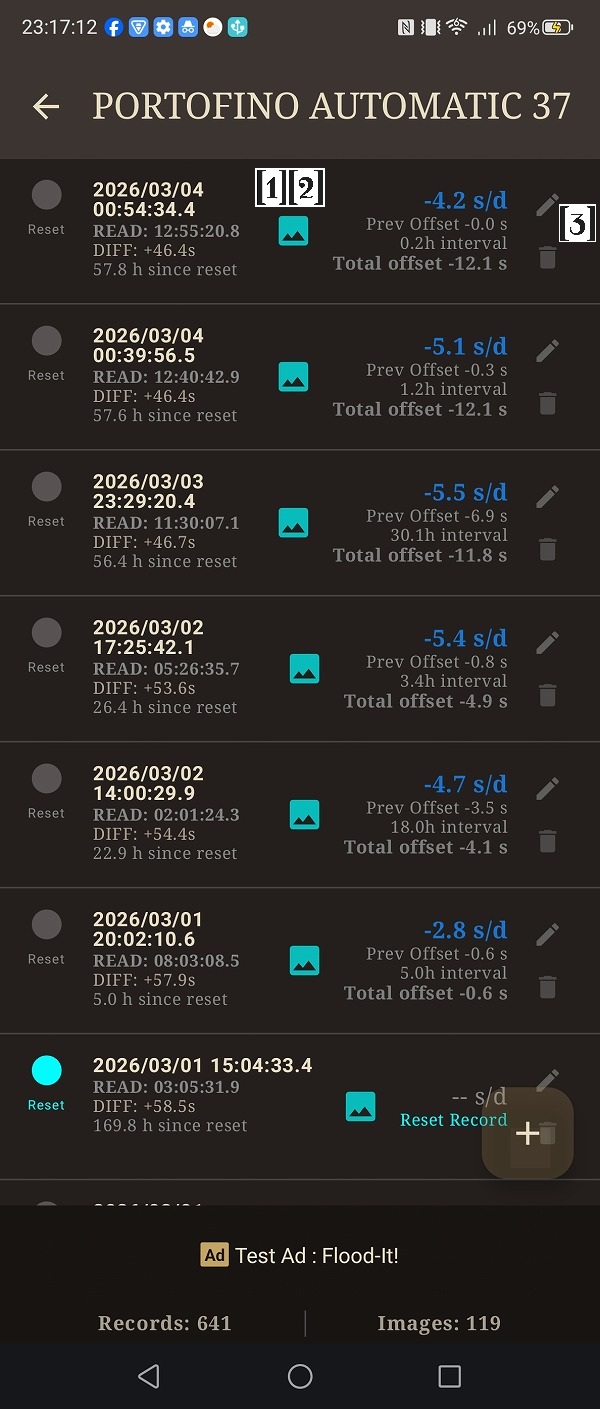
[1] Measurement Records
Displays the date (Atomic time if synced), read time, time offset, and the calculated daily rate between measurements.
測定日時(同期時は原子時計)、読み取り時刻、ズレ(Offset)、および計算された日差を表示します。
-
[2] Bulk Edit Mode
Long-press a record to enter bulk selection mode, allowing you to delete multiple records or move them to another watch profile.
レコードを長押しすると一括変更モードになり、複数のレコードの削除や、別の時計への付け替え(移動)が可能です。
-
[3] Edit Button
Tap the edit icon (pencil) on a record to manually adjust its details.
各レコードの編集アイコン(ペンマーク)をタップすると、測定記録の詳細を手動で修正できる画面に移行します。
-
[4] Edit Details & Photo
You can change the target watch, adjust the read time and photo time via the wheel picker, or toggle the RESET point. If a photo is attached, you can delete it by tapping the trash icon on the preview.
対象の時計の変更、ホイールピッカーによる読み取り時刻や撮影日時の修正、RESETポイントの変更が可能です。写真が保存されている場合は、プレビュー右上のゴミ箱アイコンをタップして画像を削除できます。
-
[5] Measurement ID (For Support)
A unique identifier for the record. This is primarily used for support. If you opted into AI data contribution and wish to request the deletion of a specific uploaded image, please contact us with this ID. (Note: Deletion may not be possible if the data has already been trained or shared.)
この測定記録の固有のIDです。通常は使用しません。AI学習のために画像を送信していて、後から特定の画像の削除を希望される場合に、このIDを添えてサポートへご連絡いただくためのものです。(※すでにAIモデルに学習済みであったり、データセットとして提供済みの場合は完全に削除できないことがあります)

4.7 Settings (設定)

-
[1] Data Contribution
Toggle permission to upload anonymized watch images to help train our AI models.
AI学習のために、測定後の画像を送信する許可のON/OFFを切り替えます。
-
[2] Historical AI Watch Analysis
Configure the Auto-Alignment feature which uses your past photos to automatically set the center and 12 o'clock positions.
過去の画像を用いた中心座標・12時方向の自動補正(Auto-Alignment)機能の使用と、精度の設定を行います。
-
[3] Storage Management & Limits
Set the maximum number of images and history records to keep. Once exceeded, the oldest data is automatically deleted. You can also export/import your database here.
画像や履歴の保存上限を設定します。上限を超えると古いデータから自動削除されます。データのバックアップ(エクスポート/リストア)もここで行います。
-
[4] Premium Subscription
Unlocks unlimited storage and full-period graph scrolling. The free version's 500-record limit is usually more than enough for regular use. Purchase is only recommended for extreme long-term tracking or large collections.
プレミアムプランを購入すると保存制限が無制限になり、グラフの全期間スクロールが可能になります。通常は無料版の機能(500件保存)で十分ご満足いただけます。